24V ATX Bench Power Supply
Introduction
I need 12V, 15V, and 24V DC for various projects that I am working on, so the 5V DC I have been using from my computer's USB port is not going to cut it any longer. This is probably common for people who have programmed microcontrollers and are finally ready to hook them up to useful external circuits. Common ATX computer power supplies are a great value when you consider the power, efficiency, regulation, short-circuit protection, and relatively low cost. I opted to use a pair of them instead of buying a purpose-built bench power supply. I think voltage and current regulation in purpose-built bench power supplies are great features, but I only need a few fixed voltages at the moment and I do not want to spend the better part of $100 for 3A of current output. Also, adding PWM-style voltage and current regulation may be an interesting project down the road.
Bill of Materials
|
|
|
|
|
|
|
$84.76 |
| item |
make |
model |
part |
vendor |
price |
quantity |
total |
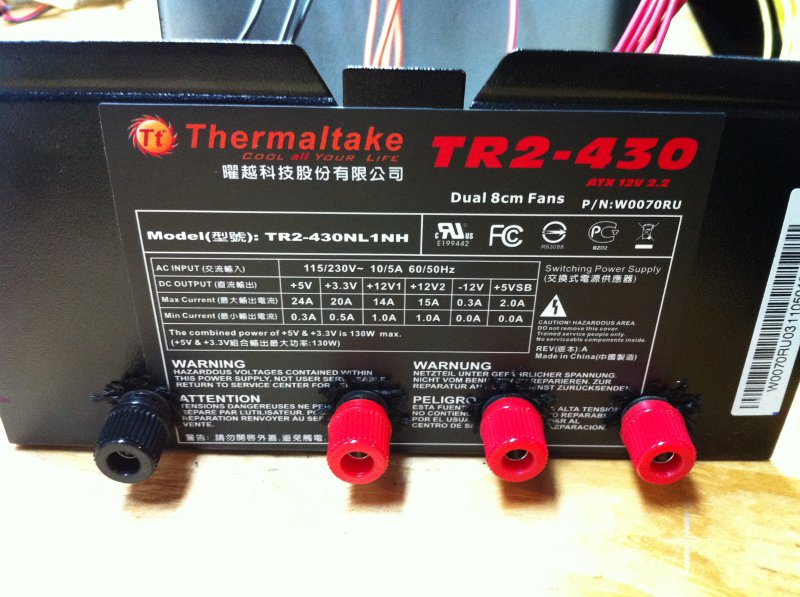
| atx
power supply |
Thermaltake |
TR2-430W |
T925-2060 |
Tiger Direct |
$35.00 |
2 |
$70.00 |
| binding post 4-pack |
n/a |
274-661 |
274-661 |
Radio Shack |
$4.19 |
3 |
$12.57 |
| 10Ω 10W resistor |
n/a |
271-132 |
271-132 |
Radio Shack |
$2.19 |
1 |
$2.19 |
|
|
|
|
|
|
|
|
Construction
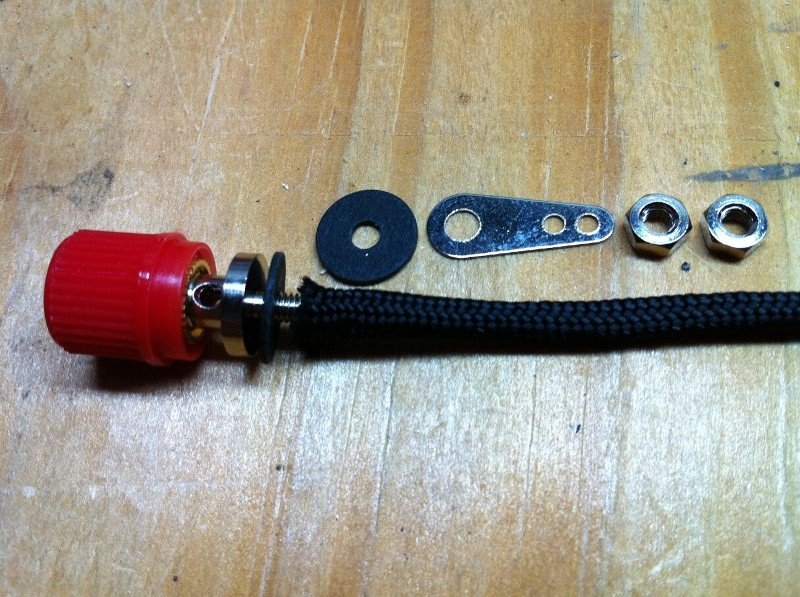
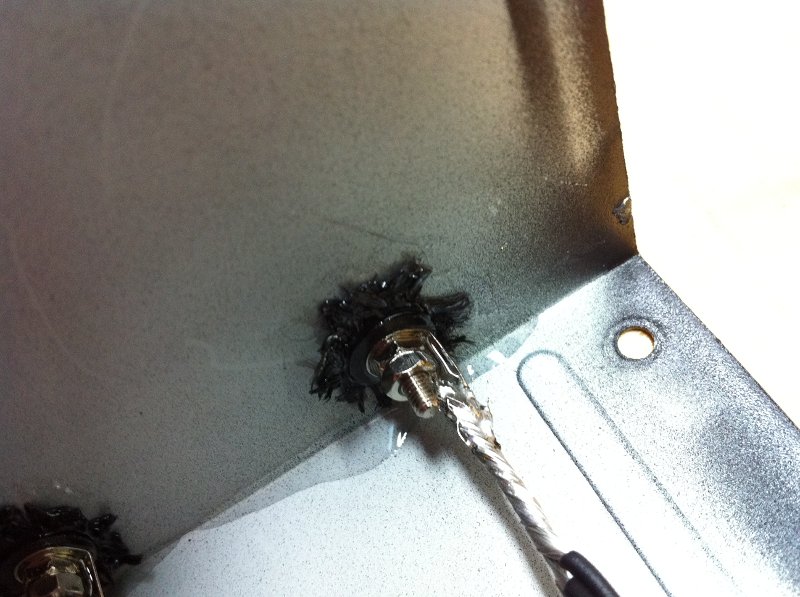
I bought several packs of mini insulated binding posts from radio shack. They are high quality, but not completely insulated. They include two disc insulators for the panel faces, but there is no insulation for the machine screw. Luckily, the sheath of standard 550 parachute cord makes a good screw insulator. I drilled 11/64" holes in the case, fed the sheath through, inserted the binding post screw, let the edges fray some on the outside, pulled the pair through the hole, and cut the sheath to fit. After tightening everything with needle-nose pliers, I tested for shorts to the case and there were none. I used soaked the frayed 550 sheath on the inside of the case with super glue and put a drop on the exposed screw to make it permanent. After drying for a day, the connection in incredibly strong. I have applied quite a bit of finger torque to the plastic binding post caps and nothing has budged. The pictures should clarify things.

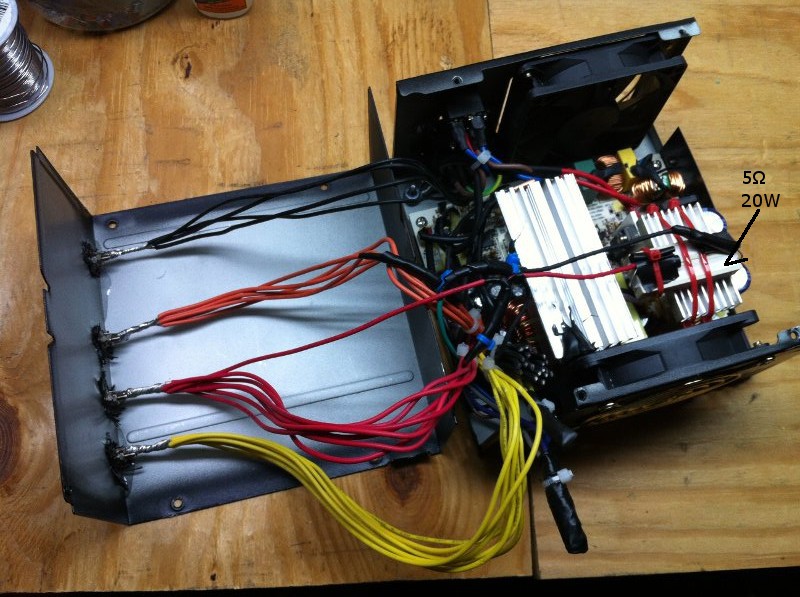
I paralleled all of the wires of similar positive voltage. I am not worried about the low-current negative leads because I am using two power supplies and I will be able to get high current negative voltages if I need them. I attached a 5 ohm 20W resistor to one of the 5V leads because many people doing similar projects recommended it; this always draws 5W while the power supply is on. I covered the exposed wires and binding posts with electrical tape and cable ties before putting the lid on. Unfortunately, I had to put the binding posts on the case lid because the dual-fan layout left little room on the back of the power supply. It is not quite as neat as some others I have seen, but this one has dual fans and is just as functional.
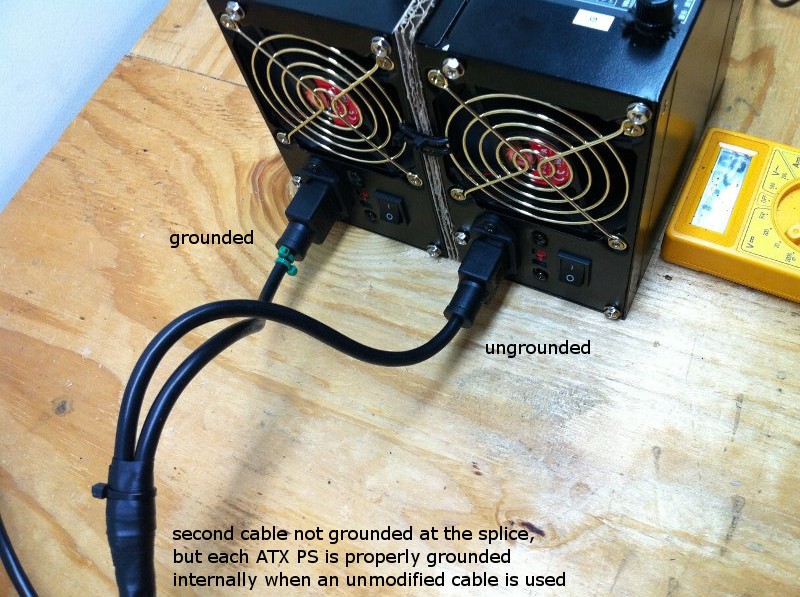
This next part is extremely important. ATX power supplies may be connected in series only if they do not share a common earth or case ground. ATX power supply DC ground is usually connected to the AC power cable's earth ground wire through the case. When connecting two power supplies in series, the positive output of the first supply will be connected to the ground of the second one and the AC power cable earth ground wire presents a short circuit path. Others recommend disconnecting or cutting the earth ground to chassis connection inside the ATX power supply. This will work, but why not perform this modification outside the power supply? I decided to create a 1-into-2 AC power cable to run both power supplies from a single outlet. One cable goes straight through with earth ground intact. The second cable splices into the hot and neutral wires only and leaves the earth ground disconnected. This allows the power supplies to be used in series, but they will both have earth-grounded chassis when connected to a normal AC power cable. Also, the series power supply cases must be insulated from each other to prevent short circuits.
Here is normal 12V operation on the finished product.

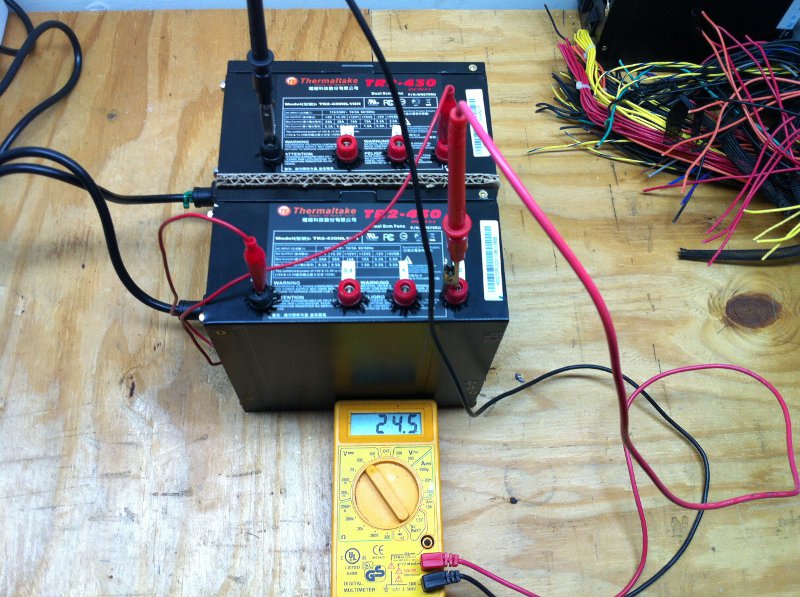
Here is 24V operation on the two ATX power supplies in series. I connected 12V on one power supply to ground on the other power supply. The full 24V is taken across the first supply's ground and the second supply's 12V.
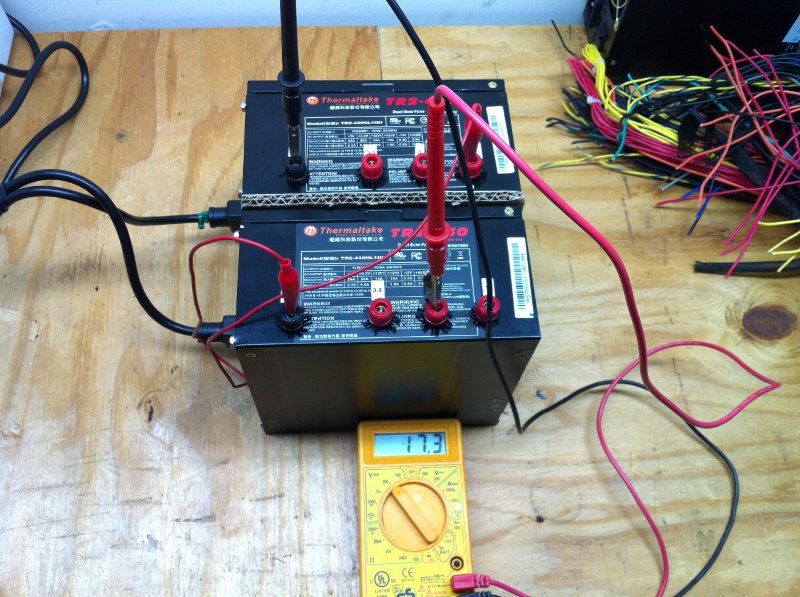
Here is 17V operation.
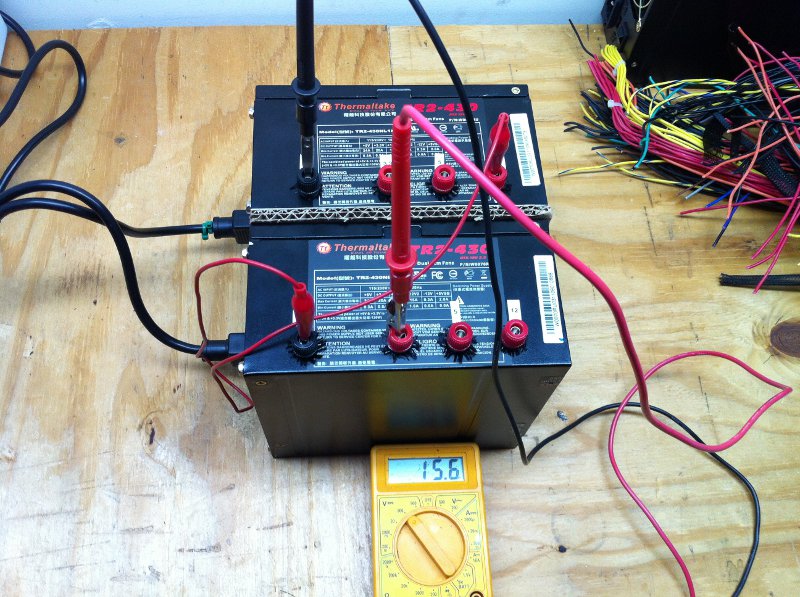
Here is 15V operation.
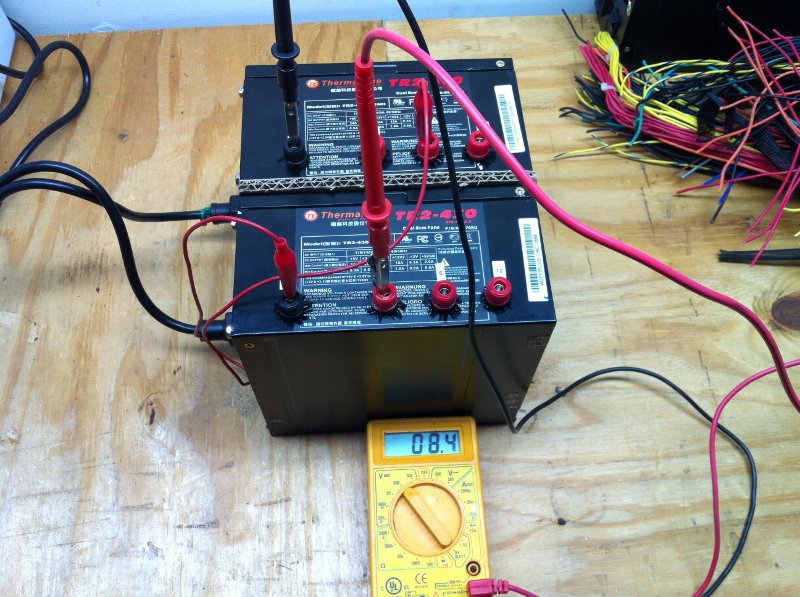
Here is 8V operation.
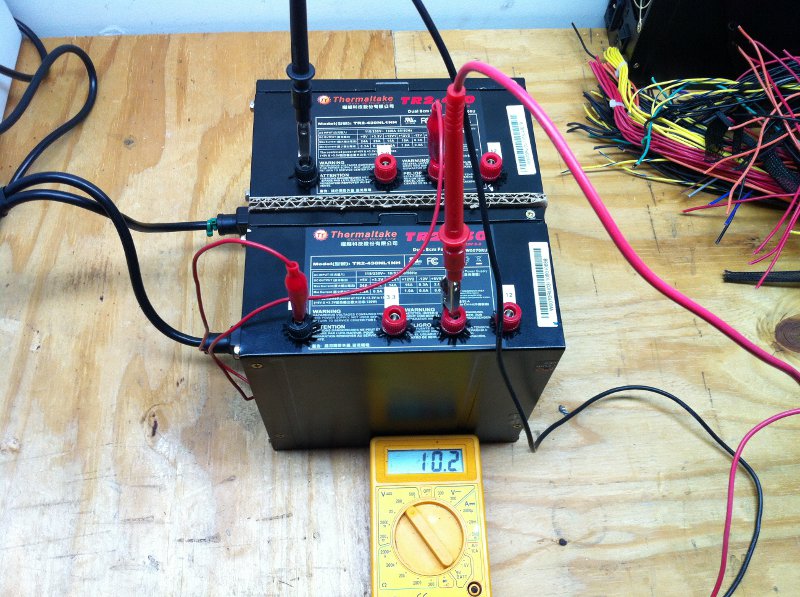
Here is 10V operation.
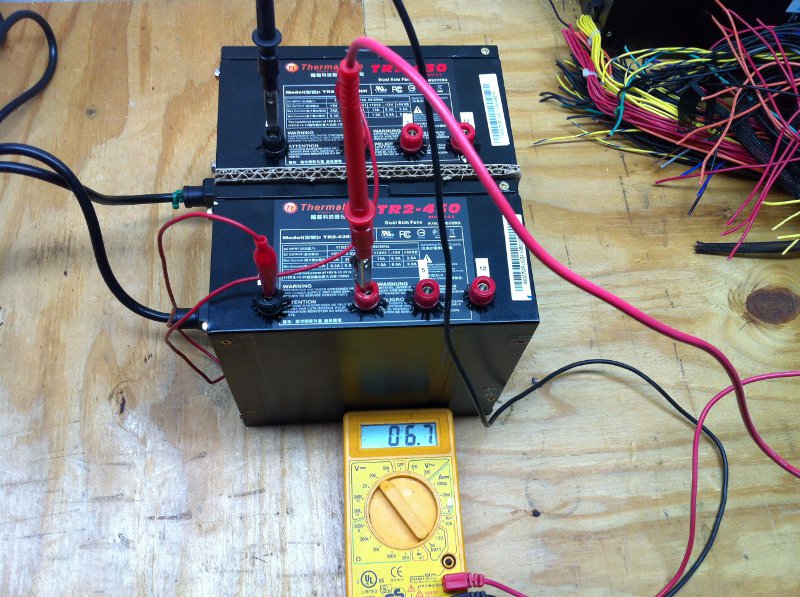
Here is 6V operation.
Summary
In summary, it works great at supports at least 20A on any single output. Perhaps the best feature is that many of the outputs can be used concurrently, which is not possible with a single-output bench power supply. I can run a microcontroller and some LEDs at 3.3V, a MOSFET driver at 5V, some cooling fans at 12V, an H-bridge driver at 15V, and some gas solenoid valves at 24V, all at the same time. Also, the power supply is very quiet at low power levels because the redundant fans are temperature controlled.